Many people can do the basic electrical wiring of a new fixture. For the most part it is black to black, white to white, green to green. But when you get into more advanced techniques like wiring the same light to be controlled from two different switches, some people get scared. Fret no further, as Dan Louche is here to teach you the understanding of the 3-way switch.
3-way switches are used to control a single light from multiple locations. This can be28 from the loft. For instance, if you wanted to turn the lights on when you got home and then off after you were in bed, the 3-way switch would be for you. Think about if you had to climb up into the loft to turn a light on and then climb back down to turn the light off in the kitchen and then climb all the way back up to go to sleep. Not the most efficient use of your time and energy.
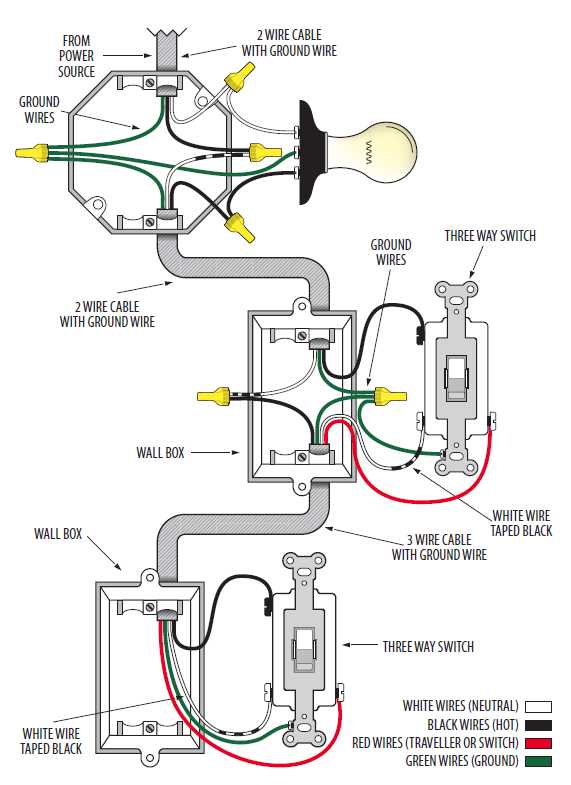
The wiring of a 3-way switch works differently than a standard switch. Instead of interrupting the power passing through it, it re-routes the power through a different path. To support this additional path, an additional wire in the sheathing is required (i.e. ‘12/3’ wire). There are also multiple ways to wire the 3-way switch depending on the order of the switches and the fixture along the line. The diagram above shows how to wire a 3-way switch with the fixture coming first and the two switches following after it. For additional diagrams and instructions, make sure to pick up Dan's book, The Tiny House Design and Construction Guide. Here is an excerpt from the video that Dan has produced concerning the electrical rough-in. This is a rare case were he uses props to demonstrate a concept, Mr. Wizard style. Normally you are seeing him do the work hands-on.
What questions do you have about three way switches? let us know in the comments below!
One of the biggest fears that people have, when building their tiny home, is properly installing the plumbing. Whether they are afraid that they are going to flood their house or just have a small leak, most people will pay an exorbitant amount of money to have a plumber come out and take care of it.
For the past 9 years, I’ve been designing and building tiny homes. In that time, I’ve seen EVERYTHING there is when it comes to people making the decision to go tiny. And I’ve noticed a lot of people making the same few mistakes over and over again, even though they are easily avoidable if you know what to look for.
When you are building a tiny house, there are many potentially dangerous situations that will come up during the construction process. Don’t get discouraged – with a few tiny house construction safety precautions and some properly paid attention, you will be a pro, build a beautiful home and actually live to tell about it. Here are five Tiny House Construction Safety Precautions that will help you know how not to die while building your tiny house.
A few years ago, Dan and I embarked on a shed style, tiny house shell for a customer. Dan, of course, has been through this a time or 20, but for me, this was to be my first tiny house build. I was excited and anxious to see the man who I view as the “Zen Master” of tiny house building, Dan Louche, in action. There was much for me to learn so now that we are complete. I thought I would share my top five tiny house lessons learned.
There is very little more terrifying for most DIYers than doing electrical work. The fear of blowing circuits, starting fires or even electrocution is usually what steers most people away from attempting to rewire anything in the house, let alone install electricity from scratch. Here we will discuss how even the most novice of tiny house builders can learn to feel comfortable around tiny house electrical wiring.